All About Artifacts
Finding a Shipwreck
by Capt. Steve Nagiewicz
Of course, finding a shipwreck is a necessary prerequisite for finding artifacts. Many wreck locations are well known. Others are secrets, and many wrecks have yet to be discovered. While you can recover artifacts from almost any shipwreck, it is these "virgin" wrecks that are often the best producers of prize items like portholes, deadeyes, and china. But how do you find a wreck like this? Research is the most productive method. This will require visiting local libraries, historical societies, nautical museums, and many other institutions. It means lots of reading and digging for information. Be prepared to spend some time searching for clues that aren't willing to be found.
Once you have a suspect shipwreck, look through old newspapers, journals, and books to determine where it might have sunk, unless you already know this, it helps to determine not only where the ship is, but what might have happened to the passengers and crew and their cargo and possessions. This can help you determine if it was salvaged. Old photos may be available to see what it looked like before sinking and where possible areas for cargo and/or passengers might be. Armed with this information, you can then begin to find the wreck.
If it's a known spot, and you're just trying to make it easier to find artifacts, your research should point you into good locations. If you actually need to find the wreck first, then you must start with its reported sinking, and begin a sea search of known wrecks, diving them to see if they fit the size, construction, and type of the wreck you are looking for. If it's an unfound wreck, looking becomes very time and cost-consuming. Side-scan sonar is a faster method that uses sound waves to image a wreck or the seafloor. It is a great tool to view large expanses of the bottom when wreck-searching.

Finding Artifacts on a Shipwreck
Actually finding artifacts usually happens two ways:
- You just get lucky and find something, when you really aren't looking. Even the greenest new diver can find something this way, usually to the chagrin of those of us who spend most of our time searching for such treasures.
- You spend some time researching the shipwreck, finding out what it was, how it looks today, and what it carried and where. Then sort through the wreckage to find the most likely spot to begin your search.
To properly excavate a dive site and record your information about where you found artifacts or ship's construction, you need to first draw a diagram or map of the site. This should include a schematic of the wreck site, dimensions, and structure. Ideally, you measure distances from central points to spots where artifacts have been recovered, a time-consuming but important process. When you measure the distance to your artifact hole from some recognizable wreck spot, you will always be able to get back to that spot, when the ocean fills it back in with sand, as it regularly does. Unfortunately, many divers simply don't do this.
Talking to other divers helps, as does asking the local dive shop, captain, or crew who frequent digging wrecks. Not every wreck has artifacts or artifacts worth finding. There are several popular ones, which always seem to produce artifacts, with a little patience, luck, and a good deal of work. Remember, things you might find or wish to find on wrecks don't often look like you would expect. They are covered with marine growth, rust, discolored, or just mangled. It takes practice to recognize what you're looking at.
Digging for Artifacts
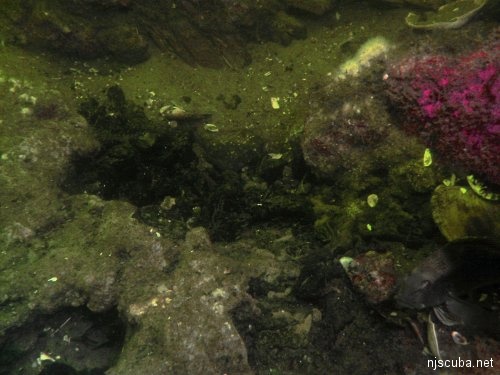
It is possible sometimes to find a nice artifact just lying on the sand. This is known as dumb luck. However, most artifacts, especially those that haven't been found yet ( ! ) lie buried beneath anywhere from several inches to several feet of sand and sediment, and perhaps even beneath the wreckage. In addition, artifacts are often concreted into masses consisting of decayed packing materials, coal, rust, and marine growth. Most artifacts must be dug-up, pried-loose, chiseled-out, or otherwise worked for, in ways that are only complicated by being underwater.
Here are some of the basic tools you'll need when digging by any means:
- Hammer: a 3-5lb sledge hammer works nicely. Stainless steel is pricey, but you won't have to replace it every year and it's nice and shiny
- Cold chisel: blade size should be 1 or 2 inches. Stainless is nice, but steel works fine, they are going to get dull after several uses anyway
- Long-handled punch: it has a round tip about the size of small marker pen and should be about 12 inches long and tapered. This allows you to chisel in small or fine places
- Pry bar or crow bar: at least 18 inches
- 100 lb lift bag & 6-10ft length of 3/8" nylon line to tie off larger objects
Digging By Hand
Hand digging is often very productive, as bottom sands are ever-shifting, and items that may have been deeply buried for years may be almost exposed. Slow fanning of sand with a hand or a clam shell often produces great finds. Of course, any sort of digging activity is going to raise blinding clouds of silt, and so is best done when there is a slight current to clear the water as you work.
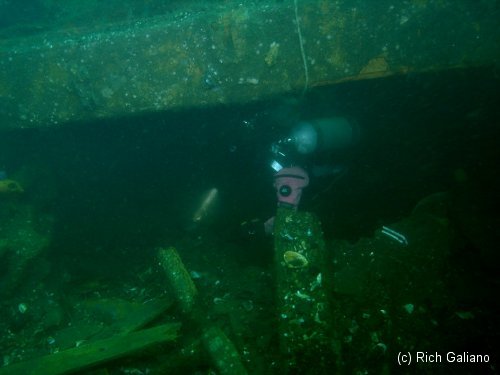
Underwater Scooters
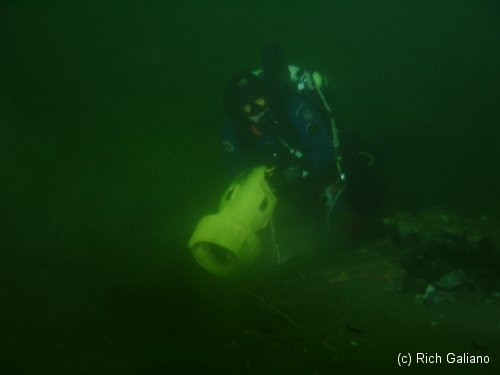
A dive scooter is built to tow divers underwater. To use one for digging, you flip it around and hold it backwards, with the power-driven propeller pointing into the bottom. Reversing the direction of the scooter will make it uncomfortable to hold and control, as it is now pushing against you. You must not only hold the scooter but must also hold onto some secure wreck structure to keep you both from being blown away. Somehow you must also figure out how to hold a dive light as well, all the time keeping a sharp eye for artifacts.
Sound complicated? Here are some tips:
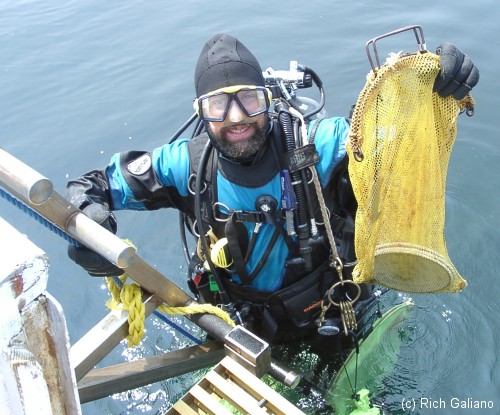
- Tuck the scooter under one arm and close to your chest, just under the armpit, and hold onto one handle with your fingers able to touch the trigger mechanism. If your arm is long enough you might be able to also hold onto a piece of wreckage using the same arm. Sounds hard, but it can be done. The other arm will hold the dive light or hold onto some secure wreckage. See the picture above.
- Try to find a spot to fasten securely a small but powerful dive light onto the shroud or base of the scooter, pointed into the direction you'll be digging. This can free up an arm!
- Tie a 3-6 ft line onto the handle of the scooter with a large clip on the other end. Sometimes you can secure this to a wreck area to hold the scooter.
- When digging a hole in the sand, aim the scooter downward for a few minutes to dig the hole, then periodically move the propellers upward slightly to knock down the rim of the hole, so that sand can escape., Otherwise, once it gets too deep, the sand will only fall backward into the hole causing you more work and using valuable battery time.
- Small artifacts will sometimes be blown out of the hole by the prop wash, so check every so often for them outside the hole.
- Watch for monofilament. It can get sucked into the scooter propeller housing causing it to stop and ruin the dig.
- Keep your dive gear securely tied away from the propeller shroud at all times. The suction from the blades will suck gear or other items through the back of the shroud and get them stuck in or hit the blades.
- Using a scooter to dig for artifacts is best with two divers in a buddy team, one holding the light and scooping sand, objects, or artifacts out of the way, while the other manages the scooter.
Surface-Supported Dredging
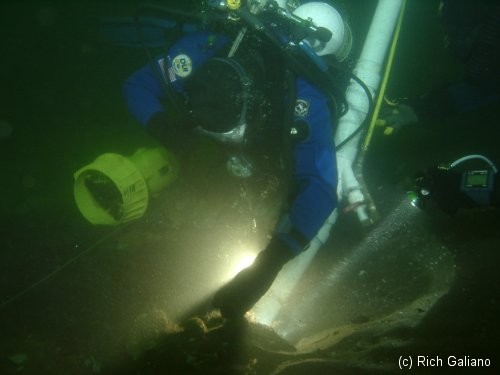
Surface-supported water and air dredges are used to remove large amounts of over-cover. In both cases, the underwater apparatus is powered by a pump in the boat, connected by a long hose, typically as long as the anchor line, or more. All this requires considerable set-up; to be worthwhile, teams of divers will often work in shifts to maximize operating time. One diver will operate the dredge itself, while a second maintains lighting, monitors the exhaust for small artifacts that might be ejected, and generally assists. Working a large dredge can be very tiring, and as always, your bottom timer is running as well. Most dredging is done at depths less than 100 feet, to get usefully long bottom times.
Air dredges are limited to fairly shallow depths, owing to the compressibility of the working medium - at 80 feet, even a powerful compressor will produce just a weak dribble of compressed bubbles. Water-powered dredges are limited more by the length of the necessary hoses. Pumping losses are not usually a problem, but at some point, the length of the hose becomes unwieldy.

Artifact Preservation
Many artifacts, if removed from a saltwater environment and stored or displayed in air, will deteriorate badly unless properly preserved. Here are some tips for the preservation of various materials after long-time immersion in saltwater.
Note on acid use - exercise caution when using any strong acid, as these are highly toxic and corrosive substances. Always use protective eye-wear and rubber gloves when handling acids, and avoid breathing fumes. The same also applies to the use of lye or other strong bases.
It is important to always rinse an artifact in freshwater prior to cleaning. This helps salts trapped in the artifact, even metal to leech out. I try to rinse these metals for several days to as long as 3-4 weeks then start the cleaning process. If they are small enough, a perfect place to constantly change water is the toilet tank in your home. Each time you flush, the water in the tank holding your artifacts changes. Just make sure you don't block the plumbing hardware and that the object fits inside the tank!
Miscellaneous Materials

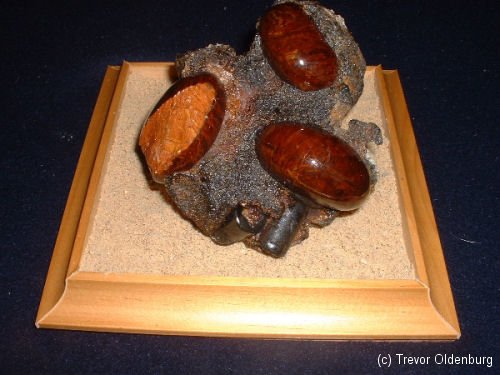
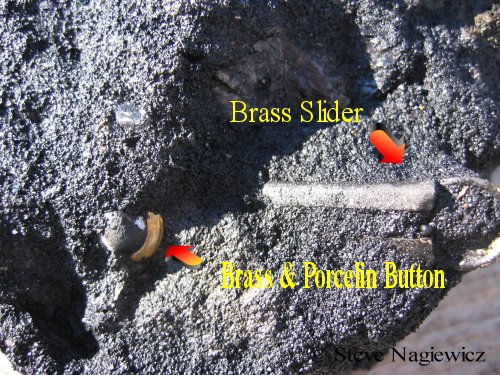
The artifacts pictured above were found in large and small clumps of the wreck, hidden within the clump, which consisted of coal, rusted iron, seafloor. material, and marine growth. When you find a clump like this, sometimes all you can see are bits of brass or glass. It usually pays to chip it apart either underwater or bring it to the surface. You never know what you'll find. These artifacts were preserved as-is, by washing in freshwater, acid cleaning the artifact with a small brush and rinsing, and drying. Two coats of polyurethane clear spray or lacquer completes the job.
Brass, Bronze and Copper
These metals usually clean up fairly easily. Unless excessive pitting and corrosion due to exposure has occurred, you need only clean off the covering of marine growth on the artifact. Light scrubbing with a nylon brush can often remove most growth. If you prefer a 'cleaner' look, then you might try an acid bath. Use muriatic acid ( commonly referred to as a 'pool' or 'brick' acid ) available from most hardware stores. Mix it at about 50%-50% with water in a rubber or plastic container.
Mix enough solution to immerse the object and let it sit for 10-15 minutes. Light scrubbing with a 'brass bristle or nylon bristle brush will help remove the stubborn stuff. This will also help polish it a bit. Then rinse thoroughly with fresh water for several minutes. If you are happy with the look, then let the object dry and display it. If you would like a more polished look, then buffing with brass polish or a spray coat of some varnish or polyurethane covering will give a nice luster and protective coating. Two or more coats will be necessary.
Really shiny finishes, like it was brand new or 'gold' luster look need for the object to be sand-blasted. Using small glass beads is better for the artifact than coarse sand. Many commercial sandblasters are available from hardware stores. Be careful that the artifact is not so fragile that it would not stand up to either an acid bath or sand-blasting! After cleaning with the blaster, rinse and let dry. I usually cover the artifact with a polish or poly-coating to keep it from tarnishing too fast using these methods.
I prefer to keep artifacts looking like they just came up from the wreck. To do this I try to keep some growth like barnacles, hard corals, or conglomeration and wreck accretion on the object, then two or three coat the artifact with poly-urethane to preserve it. Some things do look better shiny, especially portholes, so use some creativity!
There are other methods, but they involve much greater resources and training. If you are unsure, try talking to a local science teacher at a high school or local college.
Glassware and China
Glass and china clean-up very well. Like brass/bronze, only marine growth needs to be cleaned off. You can do this by soaking the artifact in a water bath and using a cloth with some scrubbing, maybe add some vinegar to the water (25%). Acid baths will also work but you run the risk of permanently etching the glass or china. If the artifacts are reasonably clean and don't smell too bad from being immersed in wreck junk, I've had a lot of success placing the artifacts in the dishwasher ( by themselves. ) Cascade or other soaps clean them up nicely. You can also do this by mixing some dishwasher soap in a container of water and hand rinsing. Bottle brushes can help clean out the interior of bottles and all. Let the object dry and display.
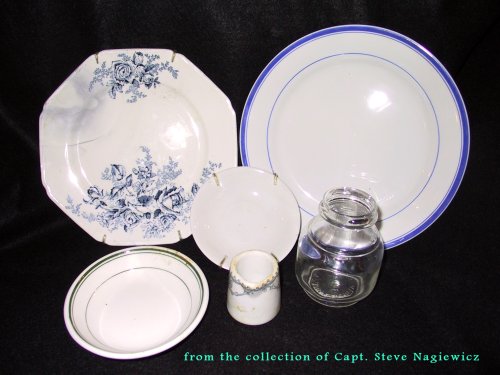
Here again, you might find the artifact conglomerated in dirt, rock, shells, etc. The bottle for example will look more authentic by trying to preserve it in this concretion and coating it with a polyurethane spray.
Silver and Pewter
Silver and pewter will survive long underwater exposure pretty well, only, if they are very near or in contact with heavier metals like steel or iron. If you remember your high school chemistry, the ionic valences of each metal will affect its ability to be affected by oxidation. Gold and stainless steel are at the bottom of this list while metals like zinc are at the top, with silver and pewter at the middle.
Clean with a vigorous water rinse over a minimum of three to four weeks, scrape off any oxidized ( usually blackened ) metal. It will usually fall off. A chemical or vinegar bath helps. Always use mild 25%-33% solutions. Electrolyte solutions of one or two ounces of citric acid and a teaspoon of salt in a water solution in a glass container large enough to cover the artifact ( larger artifacts will need proportionally greater amounts of citric acid and salt ) attach the positive(+) side of wire from 3-6 volt battery to a stainless steel rod and the negative(-) side of the battery to a clip attached to artifact immersed in the container. The current will loosen any growth. Constant monitoring is needed.
Rinse and dry. Then apply a pewter or silver polish to the cleaned artifact and display.
Gold
Gold is great! Not only is it valuable, but if you are lucky enough to find some, it will look the same as it did when it went down it with the ship. As with every artifact, generously rinse the artifact with freshwater, usually over several days to a few weeks to complete the salt-leeching process. A toilet bowl tank is a good place to do this. I'm sure you will be impatient to wait, but it will help the artifact in the long run and preservation is always the end result of our artifact hunting and collection! The level or 'carat' of the gold can be checked using gold testing kits, usually available from coin shops, or by going to a local jeweler.
Wood
Preserving wood is the hardest! Anything strong enough to get rid of growth and encrustation will likely destroy the wood. After lengthy immersion in saltwater, wood soaks up salts and minerals which fill the air spaces left by nature or boring worms. When the wood artifact is raised to the surface for the first time in many years, the salts and minerals tend to expand on contact with the drying air and break up or pulverize the cellulose structure of the wood.
To stop or slow this, lengthy rinsing and soaking in water are needed. Some wood artifacts will need to be soaked for over 6 months or more! Once you have rinsed them for this time period, slowly dry out the artifact by covering it with a damp cloth until dry. Keep damping the cloth over several days to gradually dry out both the cloth and wood. When the wood is almost dry, treat it with some type of wood preservative, like Wood Life, but not a water-proofing chemical! Some cracking and shrinking may occur, no matter what you do, but lots of water baths will help better than anything. When finally preserved, you can coat with a polyurethane spray to preserve.
There are some commercially available chemicals that work very well, but they are expensive and must be purchased in quantity. This chemical is polyethylene glycol or PEG.
Iron and Steel
Trying to preserve iron and steel artifacts can take a lot more effort than finding and raising them in the first place. Just like metal items at home or on the boat, they like to oxidize or rust. Keeping them from this natural process requires a lot of room, patience, and luck.
If the artifact is small, then electrolyte baths similar to those described in the section on silver can be used with varying success. Large artifacts, like anchors, bollards, etc. can be cleaned of loose oxidation and rust, then heavily painted with metal primers then several coats of paint. Or they can be left in their natural state until they rust into a pile of dust from the ongoing oxidation process.
Sometimes, on smaller artifacts, lye soaking or covering in petroleum naval jelly will slow the oxidation process. Here, totally immerse the object in a lye bath or petroleum jelly for several hours, wipe clean and rinse thoroughly. Use the same eye and hand precautions as with acid - lye is very caustic!.
End Notes
The preservation techniques listed here are summaries of much more involved procedures used by trained scientific preservationists and marine archaeologists. Please do not consider them solely as a method when attempting to preserve your artifacts. They were designed to give you a basic understanding of the more complete techniques.
Artifact Identification
Identifying your find adds greatly to the accomplishment, but is not always easy.
- Find out where on the wreck you found it. Its location can help to tell you a lot about what it could be. For example, if you found it near what once was a cargo area, it could very well be part of the cargo.
- What type of ship was it - sailing, steam or motor, freighter, tanker, collier or passenger ?
- When and how did the vessel sink?
- Is the artifact brass, steel, glass, etc ?
- Take a photo of it and bring it with you to the local library. Search thru the archives of old newspapers or product catalogs. Many times artifacts have been identified by seeing an old advertisement for them.
- Search the Internet of fellow divers. There are many for whom this is exciting research. These experts will also be able to point you in other directions if they can't help.
- Try to clean it enough to determine if it has any writing on it. Manufacturer name, date or number or brand name etc. This will help in your search. Track down the company and voila !
- Look through a nautical museum for similar looking artifacts. I've identified many pieces this way. One comes to mind, an oil lamp found on the Delaware, an example of which was on display at the Corning Glass Museum, in Corning, NY.
- When all of the above fails...call it whatever you'd like. Since you've just exhausted most every avenue of research, who's going to dispute you! I have a dozen or more thingamabobs, do-hickeys and whatever's on my shelves as well.
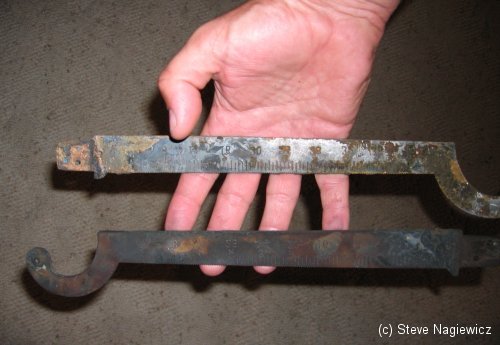
Case In Point
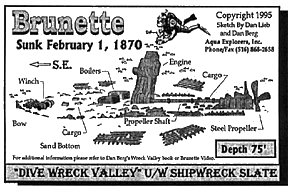
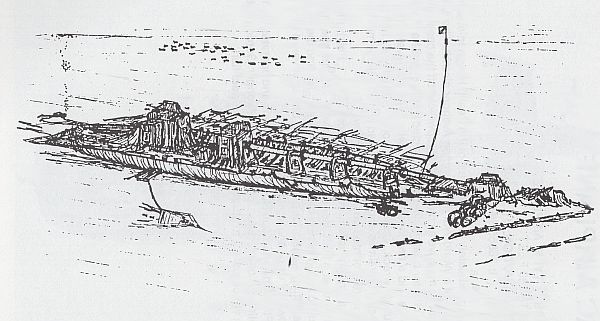
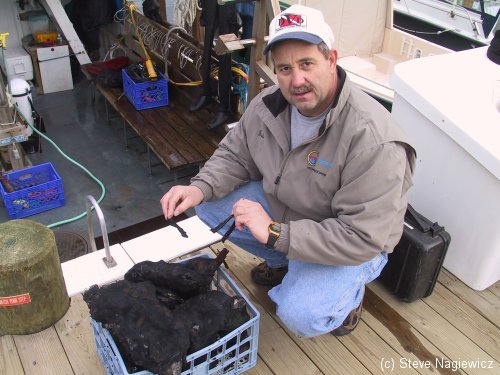
The Brunette was a small coastal steamer of 274 tons that sank in 1870. Vessels like the Brunette carried trade goods and passengers up and down the coast. Over the years, the wreck has yielded many fine artifacts, from bottles to housewares. Most artifacts are found clumped together in the coal-like concretions that surround much of the visible wreckage. The black masses, which are incredibly messy, are actually the remains of the straw that the articles were originally packed in. Delicate articles are sometimes remarkably preserved.
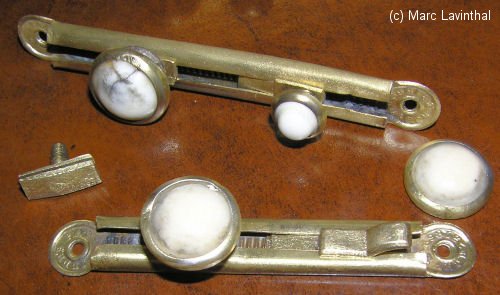
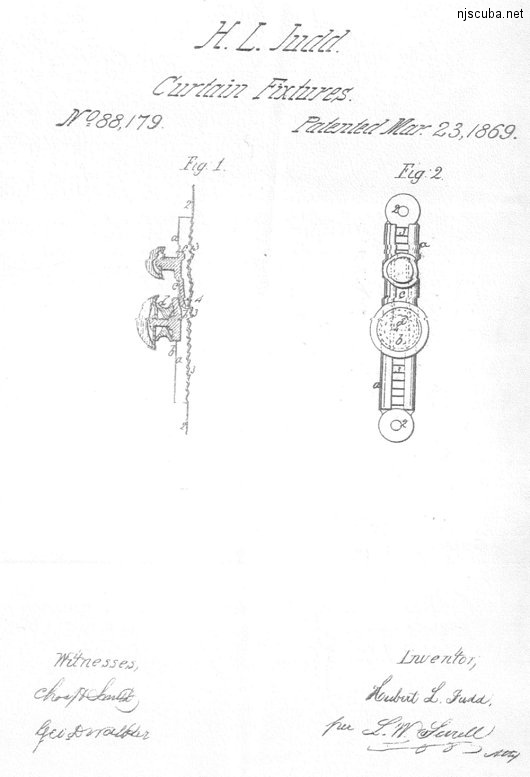
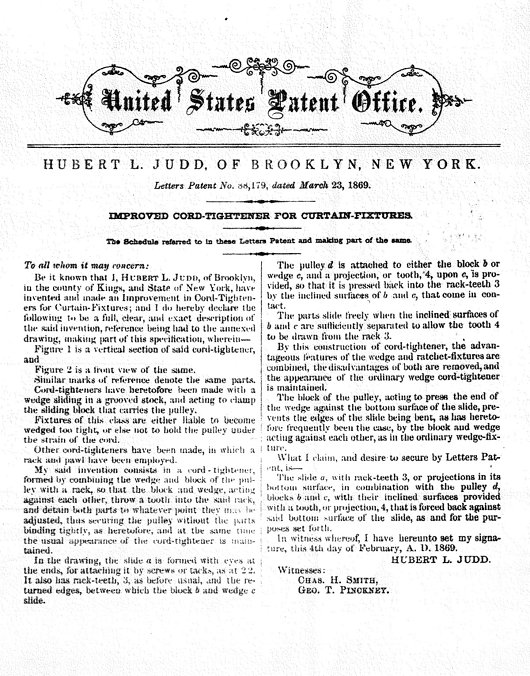
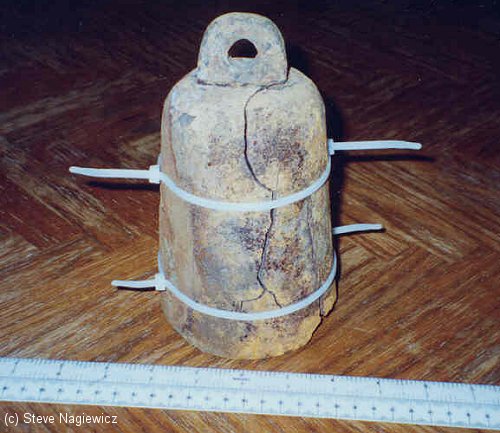
As is contained in the patent form, Mr. Judd explained the use of his cord tightener:
"He claimed the prior fixtures of this type were liable to become wedged too tight or else not hold the pulley under the strain of the cord. Mr. Judd's version would make the cord-tightener by combining the wedge and block of the pulley with a rack so that the wedge and block acting against each other throw a tooth into the rack and detain both parts to whatever point they may be adjusted. Thus securing the pulley without the parts binding tightly as heretofore and at the same time maintain the usual appearance of the cord tightener."

Very special thanks to librarian Karen Kilpatrick of the Hunterdon County Library for her invaluable researching assistance in helping us identify this object.
Final Thoughts
We as artifact divers have some obligation to properly document the wrecks and artifacts we dive so that there remains at least some record of what was found and where. If nothing else, we will always know where to go for more artifacts or at least where not to go again and waste our bottom time!