Aquarium Guide - Lighting
Lighting Basics
An unplanted aquarium should receive 6-10 hours of light per day. This can be either artificial or natural light. Direct sunlight should be avoided. While in the short run darkness does the fish no harm, how would you like to be kept in the dark most of the time? On the other hand, excessive lighting can lead to dangerous brown or green algae blooms, which can upset the entire balance of a tank, and eventually kill everything. This is caused mainly by excessive amounts of direct sunlight and is not really a problem with artificial lighting.
A little algae growth is usually a sign of a healthy tank and can be left in place or cleaned up as you like. Algae growing on plastic plants makes them look more lifelike. Non-metallic pot scrubbers are good for cleaning algae, but use a new one and then keep it only for this purpose - soap is poisonous to fish! Razor blades are difficult to use, and not recommended. Don't be afraid to get your arm wet, unless you are keeping piranhas.
Algae on rocks and decorations can be killed by placing them in a large pot of barely simmering water for a few minutes, but be careful with plastic plants, as they can be crushed and ruined by this. Never boil a thermometer - it will burst. Contrary to their name, most "algae-eating" fish do not eat algae at all in an aquarium. They will not clean up the algae in your aquarium, and in fact, will starve if not fed properly just like the rest of your fish.
Fluorescent lights are preferable to incandescent ones because they generate less heat, which can mean the difference between life and death in the summer months. You might not think of it, but an inexpensive remote control ( from Radio Shack ) can be handy for turning the lights on and off. A timer is also useful, especially when you are on vacation. Either way, use the device to turn only the lights on and off, not the heater and filter.
The tank cover should be as tight fitting as possible. Most fish will jump on occasion, and some can practically climb out, so openings should be minimized, and the cover should be kept shut. This also minimizes evaporation. If you are running an air stone, then there is no need to worry about the fresh air supply. Otherwise, daily feeding and the small gaps around the cover will let enough new air in, or you can make some small ( 3/8" ) holes in out-of-sight places for additional ventilation.
Most new covers must be trimmed at the back to fit your filter, heater, etc. Rather than just cutting out along the square lines that may be provided, spend a little extra time custom cutting the openings to fit closely. A razor knife or coping saw will go through the plastic easily. The payoff will be when your prized 'whatever' fish doesn't jump out through that crack you thought was too small for it to ever fit through. Trust me on this.
Covers that fit inside the top rim of the tank rather than on top of it are preferable. This assures that any condensation ( which can be considerable in the winter ) drips inside the tank.
Lighting for Live Plants (Freshwater)
What a confused subject this is! You can find reams of information on aquarium lighting, but almost all of it is overwrought, flawed, incomplete, or simply outright nonsense. Several of the sources I have found on the internets go on ad-nauseum without actually providing any useful answers at all. I have found so much junk that I am not going to discuss any of it. Clearly, this subject needs to be approached from a clean sheet of paper.
Let's start out with what technology is available. A lot has changed in recent years. Nowadays, LED bulbs are available in a range of sizes and 'colors' at very economical prices. These bulbs are easy to get and easy to work with. They are also compact and run fairly cool, another requirement for aquarium use. Finally, they are cost-efficient, a necessity since they will be on for extended periods every day, and also require regular replacement. Almost any old aquarium hood can be gutted and converted to LED bulbs with parts readily available at the hardware store. With some additional thermal venting cut in, an old straight-tube plastic light hood can be upgraded to two to four times its original power rating using LED.
My own experience is that "daylight" spectrum LED bulbs make excellent grow lights for house plants, and have a pleasing color for aquarium illumination. Without going into all the technical details, I will just assume that these bulbs are close enough to real sunlight that the difference can be ignored. All my plants seem to think so. By doing this, we can dump a pile of calculations and expensive measuring equipment that mainly just leads to a false sense of precision and accuracy.
So, having settled on a light source, the question becomes: what light level do we need to generate? Most aquarium plants are tropical. The tropical noon sun is about 140,000 Lux, or lumens/m2. However, most of these plants do not grow in the sun, they grow in the deep shade of the forest. The jungle floor is typically assumed to receive just 1-3% of the total sunlight, with sunbeams poking through briefly in places. At the high end then, 3% of 140,000 makes 4200 Lux, or rounding off: 4,000 Lux. That seems like a reasonable and achievable target.
LED bulbs are spec'd in lumens. To get Lux, divide by the bottom area of the tank in square meters. But that's too simple. Now we have to make a big assumption: What is the overall efficiency of light transmission from the bulb into the plants? All kinds of factors enter into this: the reflector, the height of the light above the tank, the clarity and depth of the water, height of the plants, wasted light that is reabsorbed by the bulb or spills out of the tank, etc etc, but it can all be lumped together into one coefficient for our purposes.
Now, how do you begin to quantify all these effects? Here is some intuition: With a proper reflector, the light can be assumed to be focused in one direction, straight down into the tank. Not completely true, but close enough. The effects of the water are negligible, any healthy aquarium is clean and clear, and not very deep, 2-3 feet to the bottom. That's not enough water to matter much, and many of the plants are quite tall and reach almost up to the surface. I will also mount the light as close as possible to the tank, so that will be a minor issue as well.
The big unknown factor in the equation is waste - how much of the bulb's output is simply not making it into the tank? This is in two parts: spillover and re-absorption. Spillover is light that escapes the system without striking the target - the plants. Spillover is what lights the floor around the tank. Reabsorption is the light that goes from the bulb back into itself, directly or reflected. Given the shape of a LED, twisted around itself, that could be considerable.
Spillover is probably minor, some of what would spill out is even reflected back in by the glass itself, and as I said, the light is focused down into the tank by the reflector. Re-absorption is the real killer here. It is well known that LED bulbs are designed to be used end-on, and perform as much as 50% worse if mounted side-on. But for a tank-top light hood, sideways mounting is the only practical choice. This could be ameliorated by using a big wide reflector, but a tank-top installation is typically pretty cramped, so an ideal reflector is not really a possibility either.
So, with a less-than-ideal mounting and a less-than-ideal reflector, and some other negligible factors, what transmission efficiency should I assume? I have no idea, but 50% seems like as good a number as any. ( At least that way, my error will be no more than 50%, between zero and 100%, ha ha. )
The efficiency factor sums up everything I don't know, including even any spectral shortcomings of the bulbs compared to real sunlight. If you spent a fortune on measuring equipment and a lot of time fiddling with it, ( which, by the way, does not guaranty good measurements ) you would still end up with a correction factor of some sort in your formula, I am just skipping to the end. Do you think I left something out? Nope, it's in the correction factor! Engineering guesstimation at its finest!
So, the complete formula becomes:
LUX = L x E / A
where
L = total lumen rating of all bulbs
E = efficiency = 50%
A = bottom area of tank in meters squared
Simple. There is no point in making these calculations overly complex or falsely precise, since the efficiency factor is a pure guess that could be way off. For that matter, I don't know how accurate the specs on the bulbs are either. This is just a ballpark calculation, but it is still plenty good enough to be useful. One digit of precision is all we need.
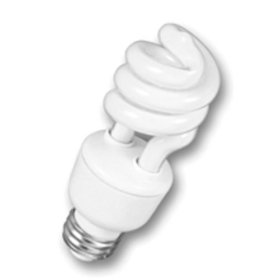
My bow-front 46 tank has a bottom area of approximately 0.3 m2. CFL "60 watt equivalent" daylight bulbs are available in 4 packs for $7 at Home Depot, with a lumen rating of 800. My rebuilt light hood has 4 sockets for even coverage. So for my particular application, ( rounding off to a single digit of precision ) I get
4 x 800 x 0.5 / 0.3 = 5000 Lux
Not bad - a bit more than my target of 4000, and probably entirely adequate. But I want my plants to really grow, so lets swap the two end bulbs for "100"s, with a lumen rating of 1600. Now I get about 8000 Lux, and nice even lighting from edge to edge. The 100 watt bulbs are cheap enough, 4 for $11 at Home Depot, so let's see what all 4 of them will do: over 10000 Lux! Too bright - overkill, and the fish ( remember them? ) don't seem to like it either, so back to the 8000 Lux setup.
But what if my numbers are way off? Well, so what? If you are not getting the results you want, it is a simple matter to increase or decrease the amount of lighting by changing bulbs, as I have demonstrated. This is much more about the practice than the theory; the whole point of these calculations is to see what is possible and find a place to start. You can fine-tune in the real world based on real results, not abstract calculations of dubious accuracy.
Finally, what is this going to cost to run? This we can calculate quite accurately. Tropical plants in the wild typically receive 10 hours of light a day, year-round, so going with my 8000 Lux setup, that's
( 2 x 13 watts + 2 x 23 watts ) / 1000 watts per kilowatt x $0.132 per kWh x 10 hours x 30 days = $2.85 per month
Less than $3 a month - that's not bad at all. In addition, for this use the bulbs should be replaced annually, so add that in. Total annual cost: under $50 !!! In the winter when the heat is on, all those watts of heat are ultimately heating the house, which you would be doing anyway, so you could call the energy cost zero, for the entire aquarium, not just the lights.
Of course, the proof is in the doing, has this setup worked? For the last 4 months, absolutely. Luxurious plant growth, with practically no algae, and healthy fish. Beautiful fish lighting, carefree, reliable, low cost, and no unwanted heating of the aquarium. The whole thing is completely automatic with an inexpensive digital timer. In fact, for two months, the tanks ended up being almost completely neglected - auto lighting, auto-feeders, water replenishment as needed, and occasion changes - weekly checkups, little more - and they THRIVED. I could hardly believe it, no unplanted tank could go that long with so little attention.
I ran it at first at the 5000 Lux level, and everything grew well but the Vallisneria. However, I wanted to experiment, so I bumped the light up to 8000 Lux, and after a few weeks the Vallisneria perked up and started growing as well as anything else. Vallisneria has exceptionally high light requirements among aquarium plants, and you might want to avoid it. All the other plants were fine at 5000 Lux, which would also reduce the electric bill.
Algae is virtually nonexistent, it seems to be unable to compete with the plants for nutrients, and the higher light level seems to make things even tougher for the algae. What little algae does grow is pleasantly green, with a few threads of red growing high up on the filter discharge, but no trace of the awful brown diatom scum that is the bane of any unplanted aquarium. In 4 months, I have cleaned the glass just once of almost unnoticeable tiny green speckles. The water has a faint tinge of green to it if you look through the tank from the side or fill a white bucket with it, not otherwise noticeable. I would consider that normal and healthy.
One thing that I have read on the internets that I believe is that duration is no substitute for intensity. In other words, you cannot compensate for inadequate lighting by running it longer. Fourteen hours is not better than ten. You can however easily increase the lighting to an adequate level by simply changing bulbs. With multiple sockets, you can mix and match, both wattage and color, you are no longer limited to a single bulb.
Another suggestion I have experimented with is an "algae break" - a deliberate 2-3 hour break in illumination in the middle of the day. The theory here is that higher plants are much better at changing gears, stopping and starting photosynthesis in response to light levels, than algae, which is assumed to be metabolically much simpler, something that is not really so. Therefore, the theory is the dark period retards algae growth without significantly affecting the plants. Actually, I doubt that, but is easy to do with a timer, and there is another better reason to do it: it allows you to have your tank illuminated in the morning and evening without having the lights on for fourteen hours a day. I run the lights from 7AM to 11AM, and then 4PM to 10PM, and seldom ever have to switch them on manually to enjoy my aquarium.
On another subject, I have had great success using small clay flowerpots in the aquarium. All my plants are potted in aquarium gravel with a pinch of potting soil mixed in at the bottom. That is surprisingly un-messy, although probably unnecessary. The pots vary in size (diameter) from 3 to 5 inches. There are many advantages to potting your plants like this. Recently, my tanks were broken down completely and moved, and the plants suffered not in the least for it. The roots invariably find the hole at the bottom and escape from the confines of the pot, but the plant remains self-contained and portable, and will recover quickly even if the outside roots are damaged. With enough gravel in the tank, you can bury most of the pots completely, otherwise, they don't look too bad with just the rims showing. I have found pots in a rainbow of colors: orange, brown, tan, red, green, blue, glazed, and unglazed. The pots themselves become part of the decor.
I also dose regularly with a liquid plant food containing chelated iron. I have found in landscaping that iron is a critical nutrient for lawns and trees that is often overlooked. Adding iron to a lawn will result in lush thick growth and a deep shade of green that will shock you, without causing it to shoot up knee-high every five days. Fast-growing trees will stop and yellow when they exhaust their available iron. At some level, all plants are the same, and assuring a good supply of iron will make any plant grow better. As far as other nutrients like nitrogen, calcium, and phosphorus, if you have a good stock of fish in your tank, they are undoubtedly providing more than enough of these in their waste. Fish can also be a source of CO2 for the plants, although to what extent I do not know. Manganese has similar effects to iron and is probably also a good thing to add.
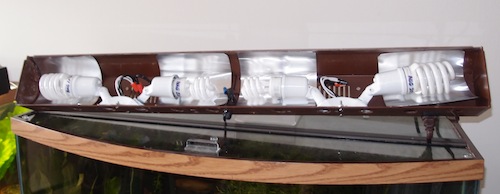
I apologize for the lack of colored graphs, complicated formulas, and reams of statistics in this article. I will try to make up for that with some pictures of an old 36" fluorescent Perfecto hood that I converted to CFLs, which anyone handy could use as a blueprint to make their own. It's a shame to buy a new one and chop it up. People throw these away all the time, keep your eyes open on trash day, and don't be too proud. I thought about replacing it with a custom-made wood piece, but it works fine.
First, all of the old straight-bulb fluorescent guts are removed and discarded, and all the internal mounting bosses are trimmed off. The original switch and cord are retained. Note how the top vents are much more open now. At this point, cut or drill a series of ventilation holes in the back where they don't show. I used a one-inch drill bit. This will allow a natural convective airflow that will keep the entire fixture much cooler than it originally was, even at more than 4 times the original power rating.
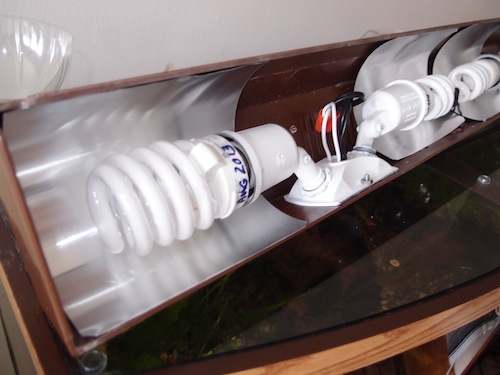
The fixtures are outdoor floodlights, with the round flanges trimmed to fit inside the hood, and the sockets cut-back to accept fat CFL bulbs. About $10 a set. The 36" hood has room enough for four sockets in two pairs. You could probably shoe-horn a fifth socket into a 48" hood, a single dual-mounting should do for a 24" model. Remember to leave enough room to change the bulbs, and also make sure you are not locating a bulb directly above a tank frame that would block it. The reflectors are inexpensive pieces of aluminum gutter flashing, held in place by the bulbs and their own spring tension.
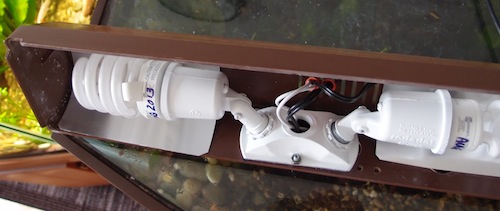
The fixtures are fastened to the back of the hood with nuts and bolts, so from the front, it still looks factory. The reflectors are curved pieces of aluminum gutter flashing, held in place by the bulbs. Anything metallic and shiny would work - aluminum foil or cut-up tomato cans. The reflectors protect the plastic hood from the direct heat of the bulbs. Wire nuts around water? That's how the original wiring was done, so why not? This is designed to be above a glass cover, not directly exposed to the water.
And that's all there is to it. All of this could be done with a Dremel and a drill in your kitchen, although for me it was much faster on the band saw in the garage shop. This is hardly the only way to do this - go to the hardware store and you can find many other types of sockets that can be used with a little imagination. In fact, the entire fixture can be built from scratch using a length of plastic gutter end caps.
There are many advantages to doing your own DIY lighting setup like this. It requires no special power supply, just plugs into the wall. It is fully compatible with timers, dimmers, and remote controls. No heat sink is required. No soldering is required. Burned-out bulbs are easily replaced. But probably the greatest advantage is that your upgrade path is easy and assured. Once you have installed regular light sockets, you have a multitude of lighting options waiting for you at the hardware store, with new and better ones coming all the time. I recently changed out the CFLs for LEDs. In the process, I removed the pictured sockets and replaced them with smaller cheaper ones, that let me shoehorn 6 bulbs into the same space. LEDs get better, smaller, and cheaper all the time, and the result is brighter, whiter, and more even, with 33% less power consumption, which means 33% less heat - the outside of the hood barely gets warm now.
I have boiled this calculation down to the absolute minimum. Rather than deceive myself with a pile of small inaccuracies, I replaced them all with one big one, which I fully acknowledge. The goal was two-fold: proof-of-concept, and to find a starting point for real-world experimentation. That goal is achieved. Build yourself a light hood like this, buy an assortment of different-sized daylight CFL or LED bulbs from the hardware store, and find out what grows.
Update:
I have since scrapped the plastic light hoods in favor of wooden ones that I built. The wooden hoods are large enough to hold the bulbs at an angle forward and down, with room at one end for an auto feeder inside. The back of the hood is completely open for ventilation, which keeps the bulbs at a reasonable temperature. Each hood has a detachable power cord instead of an on/off switch, and also a power outlet, which allows them to be daisy-chained together off one timer. The large flat tops serve as shelves. A magnet at the front holds the cover up when open.
Also, LEDs have supplanted CFLs. It is the color that is important, not the technology.
- Tank
- Water
- Temperature
- Filtration
- Lighting
Keeping aquaria is a hobby I have enjoyed for many years, and I have gained what I think is some useful experience on the subject. I also have a number of excellent books on aquaria, and a degree in Biology from a famous university which is slowly fading from memory ( the degree is fading, not the university. ) There is a great deal you can learn about this subject from books, and the people at your local pet store, and I will try to avoid duplicating that in detail. I will also spare you the chemical equations, most of which I used to know. My purpose here is to tell you what you won't find in books, and what your pet store guy may not tell you, as well as some of the pitfalls along the way that I have discovered by falling into.
More: Aquarium Guide ...