Dive Planning (1/2)

Here is a description of recreational dive planning. The purpose here is to demonstrate basic dive planning and use of Dive Tables for non-divers who are interested in becoming certified but are worried about the complexities and math involved. Learning to use dive tables is usually the single most daunting classroom task for a student diver. It's really not all that hard.
The purpose of dive planning is to manage the Nitrogen gas that is absorbed into the tissues of your body while breathing air at higher-than-normal pressures underwater. If you absorb too much Nitrogen at depth and then ascend to normal atmospheric pressure, the gas will form bubbles in your blood and tissues. This is called Decompression Sickness, commonly known as "the bends." Decompression Sickness can vary in severity from barely noticeable to fatal, depending on your dive profile and other factors. The goal of no-decompression dive planning is to plan your dives in advance so that under no circumstances* can ascending to the surface result in Decompression Sickness.
* statistically speaking
Warning:
These dive tables are presented here solely as examples, and should not be used for real dive planning, or by individuals who have not been certified to dive by a major certification agency. It should be noted that Navy Dive Tables are designed for young male divers in top physical condition, and allow for an "acceptable" loss rate. Recreational or "Sport" dive tables are more conservative, allowing for divers of all ages and physical conditions.
Dive planning is done with Dive Tables. Interspersed throughout this article are reproductions of the actual Navy Dive Tables. General step-by-step instructions are in normal black text and numbered. Helpful definitions are in blue text, and a specific real-world example is presented in the blue boxes. Please also read the warning above. The Navy Dive Tables are arranged in three sections, labeled Table 1, Table 2, and Table 3 here. We begin with Table 1.
Table 1

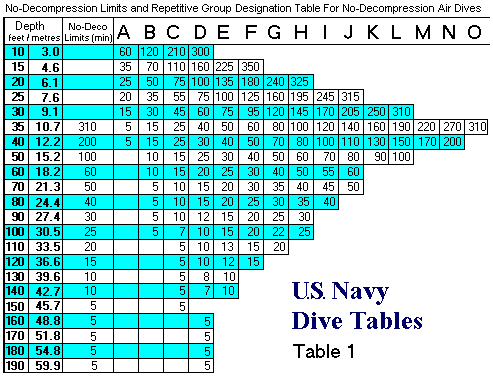
- Select the intended maximum Depth for your dive in the first column, then move across that row to find your intended bottom time in the columns below the big letters. For a single dive, if your plan falls within the No-deco Limits, you are finished. For repetitive diving, note the Pressure-Group Letter above your actual dive time.
The Pressure Group is a rough estimation of your nitrogen-absorption state at the end of the dive.
Here is a real-world example that you can work through as we go:
Print this page and trace out the operations with a pencil if that helps.
Let's make a dive to 90 ft for 20 minutes, with a 90 minute surface interval between dives, and then another dive to 80 ft for 25 minutes - a typical New Jersey dive profile: Tolten - Mohawk
We begin with Table 1: ( above )
- In Table 1, move down the first column to 90 ft.
- Move across the 90 foot row to 20 minutes. ( Do not include your 5 minute safety stop at 15 ft in your bottom time. )
Note that our maximum bottom time ( in column 3 ) is 30 minutes, more than what we are planning, so we are ok. If we were doing just one dive, we would now be finished. But we're doing two dives, so now we need to plan the second one:
- From the same spot in Table 1 [ 90 ft / 20 minutes ] move up to Pressure-Group Letter F.
Table 2

- For repetitive diving, enter Table 2 along the diagonal at your Pressure-Group Letter from Table 1. Move across that row until you reach the pair of numbers ( hours:minutes ) that brackets your surface interval - the time you spent out of the water between dives. Move down that column to find your New Group Designation.
The New Group Designation is a rough estimation of your nitrogen-absorption state at the end of the surface interval.
Continuing our example ...
- Enter Table 2 on the diagonal at F and move across,
ending up at [1:30 / 2:28 ] - Move down that column to get New Group Designation D.
Table 3

- In Table 3, at the intersection of your New Group Designation and your Repetitive Dive Depth, find your Residual Nitrogen Time. Subtract that from the No-decompression Limit for the next planned dive to get your Adjusted No-decompression Limit for the next dive. This is how long you can stay down on the second dive.
Residual Nitrogen Time is the time you would have to spend at your next planned depth to achieve a nitrogen absorption state equivalent to what you already have from your previous dive. In other words, it is bottom time that you have already used.
Continuing our example ...
- Enter Table 3 at Group Designation D.
- Move down that column to the 80 foot row, and read off the Residual Nitrogen Time - 18 minutes.
- From Table 1 or Table 3, the No-decompression Limit for 80 ft is 40 minutes.
- Subtracting our Residual Nitrogen Time from the No-decompression Limit, we get an Adjusted No-decompression Limit of 40 - 18 = 22 minutes for our second dive.
So we need to adjust our plan of 25 minutes down to 22 minutes. Alternatively, we could extend our surface interval by another hour, which would increase our Adjusted No-decompression Limit to 27 minutes.
Do you think you can do this ? Then you can be a diver !
Extra Credit
These dive tables are designed for planning just one repetitive dive, but they can be used to plan more than one with a simple trick:
- To begin calculations for a third dive, instead of using our actual bottom time of 22 minutes in Table 1, we will use the sum of that plus our Residual Nitrogen Time from the previous dive: 22 + 18 = 40 minutes.
- This places us in Pressure Group I rather than Pressure Group F
( always round up when necessary. ) - Enter Table 2 at Pressure Group I, and continue as before.
If you plan to do more than two dives per day, you really should get a dive computer, which will perform the correct calculations for you much more accurately than the table. In fact, if you plan to dive much at all, you should get a dive computer. Nowadays, tables like this are a quaint but useful way of teaching the fundamentals of decompression theory to students, but are seldom used for recreational ( no-decompression ) dive planning. ( Technical diving is a different matter, and relies heavily on tables of a different sort - decompression tables. )
Note that this is not an exhaustive demonstration of all the mathematics and physics involved in an Open Water dive certification, but is a good taste of one of the more difficult aspects. For those who are interested in the technical details behind this sort of dive planning, see decompression theory.

